

1 using pc
download
- Device powered ON
- At least 50% battery level
- Internet connection necessary
- USB Cable (the original one recommended)
-
- Double click the desktop icon of Kingo Android Root and launch it.
After launching Kingo Android Root, you will see its interface as shown below.
-
- Plug your Android device into your computer via USB cable.
If your device driver is not installed on your Computer, Kingo will install it for you automatically. Make sure you get Internet conenction so that device driver can be downloaded. If you are using Windows 8, you may need to change some settings first. When running Kingo Android Root on Windows 8, the issue you may most likely encounter is driver installation looping.
-
- Enable USB Debugging mode on your Android device.
USB Debugging mode enabled is a necessary step of Android rooting process.
how to enable usb debbugging in android
USB Debugging Mode is one thing that you cannot skip to know if you are an Android user. The primary function of this mode is to facilitate a connection between an Android device and a computer with Android SDK (Software Development Kit). So it can be enabled in Android after connecting the device directly to a computer via USB.
USB Debugging Mode, in some versions of Android, is also called Developer Mode. Then it is relatively easy for you to understand that this USB Debugging Mode establishes a direct connection between an Android Device and a computer and readies it for deeper-level actions. You may come across a pop-out notification as it shows below:
What is USB Debugging for?
USB Debugging Mode is definitely important, as you can see. But why? What capabilities that it carries make this mode so important? What is USB Debugging for?
You’ve probably got the idea that USB Debugging Mode grants you a level of access to your device. What kind of access, you may ask. This level of access that USB Debugging Mode grants is important when you need system-level clearance, such as when coding a new app. This mode, also called Developer Mode, allows newly programmed apps to be copied via USB to the device for testing. Depending on the OS version and installed utilities, the mode must be turned on to let developers read internal logs.
But it does more than that. There are a few non-development-related benefits from this new level of access that can give you much more freedom of control over you device. For example, with Android SDK, you gain direct access to your phone through your computer and that allows you to do things or run terminal commands with ADB. These terminal commands can help you restore a bricked phone. So this mode is a useful tool for any adventurous Android owner.
Of course, the background knowledge is always complicated for those non-experts. This is exactly what Android Update exists for. Android Update incorporated all these complicated features and tools to make it easy for you.
The ways to enable USB Debugging mode, which is accounted for the key step in Android rooting process, vary from one Android version to another. USB Debugging is required by adb, which is used for rooting, backing up, installing a custom ROM, tacking screenshots from computer and more.


First, you need to enable “Developer Options Menu”.
-
- Click Menu button to enter into App drawer.
- Go to “Settings”.
- Scroll down to the bottom and tap “About phone” or “About tablet”,
- Scroll down to the bottom of the “About phone” and locate the “Build Number” field.

-
- Tap the Build number field seven times to enable Developer Options. Tap a few times and you’ll see a countdown that reads “You are now 3 steps away from being a developer.”
- When you are done, you’ll see the message “You are now a developer!”.
- Tap the Back button and you’ll see the Developer options menu under System on your Settings screen.
Now, you can enable USB Debugging mode.
-
- Go to Settings>Developer Options>USB Debugging. Tap the USB Debugging checkbox.

-
- Settings > About Phone > Build number > Tap it 7 times to become developer;

-
- Settings > Developer Options > USB Debugging.

Warning USB Debugging should only be enabled when you need it. Leaving it enabled all the time is kind of a security risk for that this mode grants you high-level access to your device. Say if you connect your Android phone to a USB charging port in a public location, the port could use the USB access to your phone to access data on your phone or install malware. This could happen when and only when USB debugging mode is enabled.
To disable USB Debugging and other developer options when you don’t need them, slide the switch at the top of the screen to OFF.
back to rooting
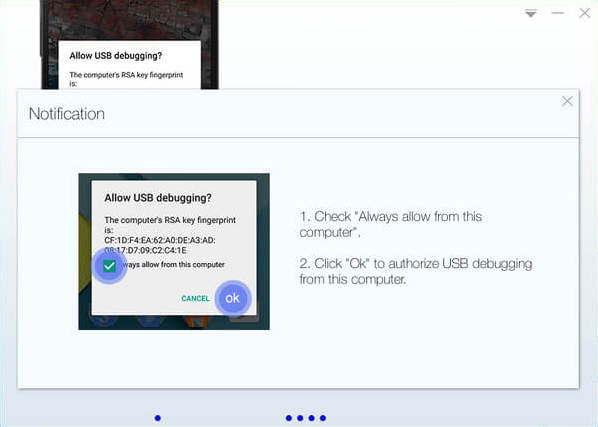
- press ok
-
- Check the root status of your device.
Normally, you will find an app named “SuperUser” installed on your device after successful rooting.
-
- Read notifications carefully before rooting your device.
Android rooting is nothing big. However, it is not exactly a small issue either. Rooting your device may open a door for you, and yet with risks.
Android rooting is a modification process to the original system, in which the limitations are removed and full-access is allowed and thus resulting in the ability to alter or replace system applications and settings, run specialized apps and even facilitate the removal and replacement of the device’s operating system with a custom one. Rooting your device will immediately void your warranty… Click to know more about Android Rooting.
-
- Click “ROOT” to root your device.
Kingo Android Root will employ multiple exploits on your device, which will probably take a couple of minutes. In the rooting process, your device may be rebooted several times. Do not be panic, it is perfectly normal. And once it begins, please DO NOT touch, move, unplug or perform any operation on your device.

-
- Root succeeded.
Hopefully your device is well supported and successfully rooted by Kingo. Until your device reboots itself, do not operate.

-
- Check the root status of your device.
Normally, you will find an app named “SuperUser” installed on your device after successful rooting.

Leave a comment